An advanced (but worth it) enhancement for better answers
Let’s talk about something Copilot Studio doesn’t give us out of the box — yet is super important: user feedback. I’m talking about a simple thumbs up/down to know if your AI responses are actually helping people. Sounds basic, right? But getting it to work smoothly took a good chunk of effort — so I’m here to save you that time.
In a previous article Tracking User Interactions in Copilot Studio — A Smart Workaround for a Critical Gap – AI and Digital Transformation, we did set up logging to capture user questions, answers, emails, and timestamps into an Excel file. That was the foundation. Now, we’re adding one more juicy layer: capturing whether the user liked the answer or not — thumbs up or thumbs down — and storing that feedback too.
Let’s dive in. 😎
🔧 Step 1: Add Thumbs Up/Down to the Chat UI
We start with the guide from Add feedback for every response — Microsoft Copilot Studio | Microsoft Learn. It gives you a great starting point, but it’s not the full picture.
The trick is using an adaptive card to add custom thumbs up/down buttons right after the Copilot generates a response. These buttons send predefined messages back into the chat — and that’s our hook to track feedback.
I don’t need to reiterate this; just follow the Microsoft guide to create your UI, Once that’s done, head to the next step.
🧠 Step 2: Capture User Feedback When They Click
When a user clicks on a thumb, it triggers a message in the chat like:
- “This generated answer was useful”
- “This generated answer wasn’t useful”
Here’s how to handle it:
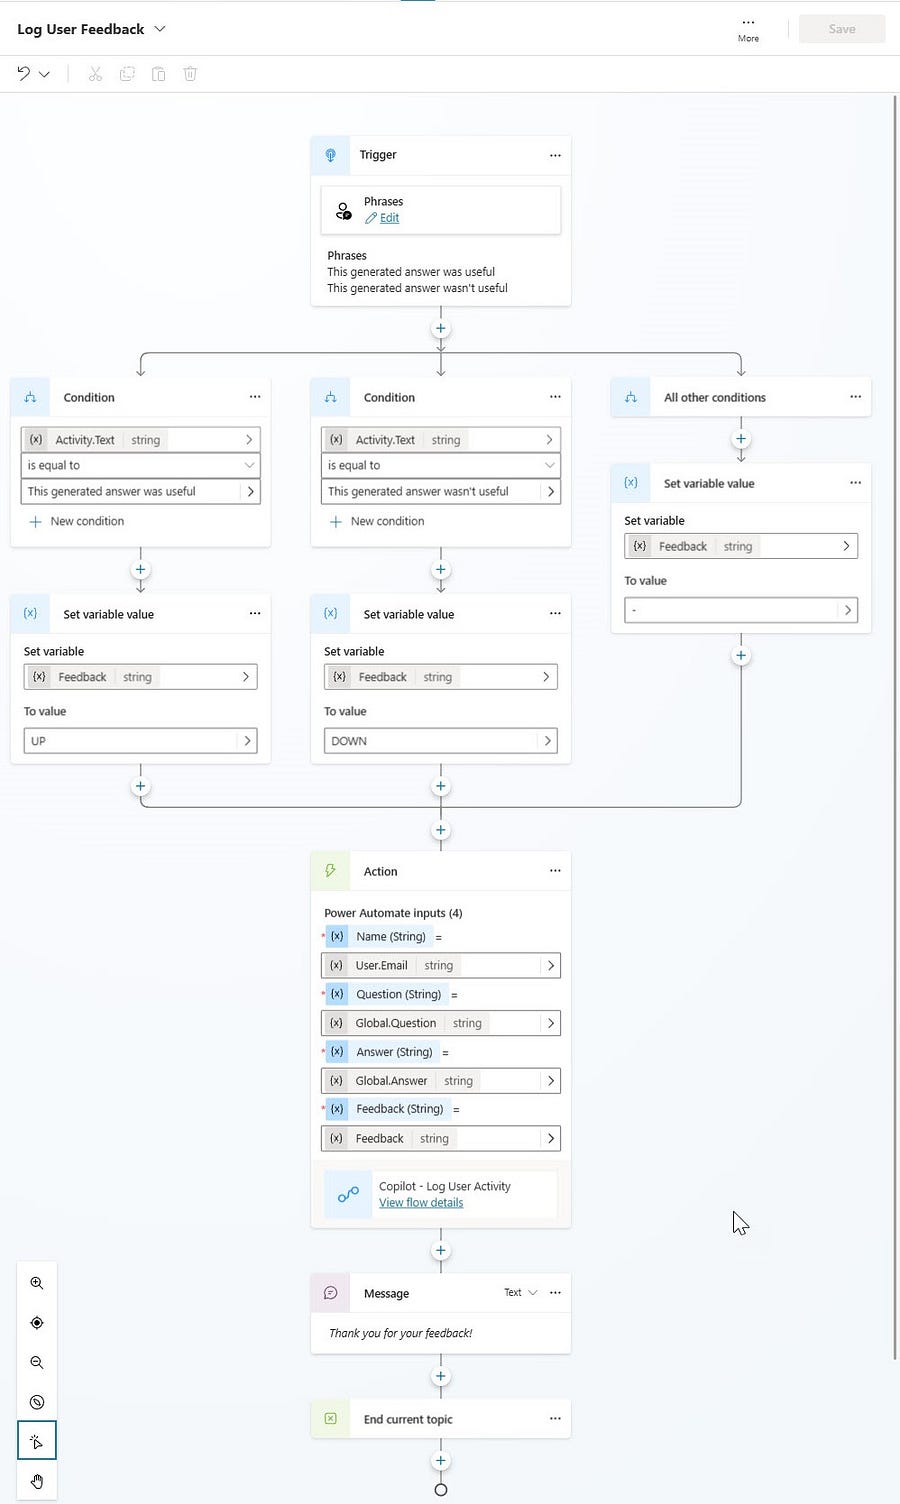
- Create a new Topic in Copilot Studio called
UserFeedback. - Set the Trigger Type to Phrase and add both phrases above as triggers.
- Inside this topic, add these simple conditions:
- If
Activity.Text= “This generated answer was useful” → SetFeedbackvariable to"UP" - If
Activity.Text= “This generated answer wasn’t useful” → SetFeedbackto"DOWN" - Anything else? Set it to
"-"just to keep things clean.
Boom — now you’re tracking feedback clicks. Your flow should resemble the image; it may appear complex, but it’s actually very simple.
💾 Step 3: Save It All to Your Excel File
You’re halfway there. Now we just need to connect this feedback to your existing logging flow in Power Automate.
- Add a “Feedback” column to your existing Excel file.
- Go to your existing Power Automate flow from the setup.
- Add a Feedback input variable to your “Run a flow from Copilot” step.
- Update the Excel action (
Add a row into a table) to include the newFeedbackcolumn. - Save everything and publish both your Power Automate flow and your Copilot Studio bot.
🧪 Test & Enjoy 🎉
Fire up your bot, give it a spin, and start collecting feedback from your users — all stored neatly in Excel, ready for analysis. It’s a small upgrade with a big payoff: you’ll finally know what’s working, what’s not, and where to focus your improvements.
Let me know if you try it out — or if you want help customizing your Copilot Studio experience further. Always happy to geek out over cool use cases.
Need a Hand?
If you’d like help implementing this — or want to take your chatbot strategy to the next level — drop me a line at [email protected]. Happy to chat!
— –
Want to stay ahead of the AI curve? Follow me here or on LinkedIn and subscribe to my blog at aialchemysolutions.com for more hands-on AI solutions for business leaders.