Let’s be honest — Copilot Studio is great, but if you’ve ever tried to track what users are actually doing inside your chatbot experience, you’ve probably noticed something big is missing: user activity logging.
As someone who lives and breathes product development, I found this lack of visibility frustrating — especially for teams that want to understand how users interact, what questions they ask the most, what answers work (or don’t), and how to plan the next iteration of their chatbot experience.
Simply put: this data is gold. Without it, you’re flying blind. With it, you’ve got insights into feature requests, user pain points, and real product value. So I decided to fix that using a workaround through Power Automate — and now I’m sharing it with you.
Here’s how to build a simple yet powerful user activity logging system for Copilot using Power Automate and Excel.
Step 1: Capture User Questions and Bot Answers
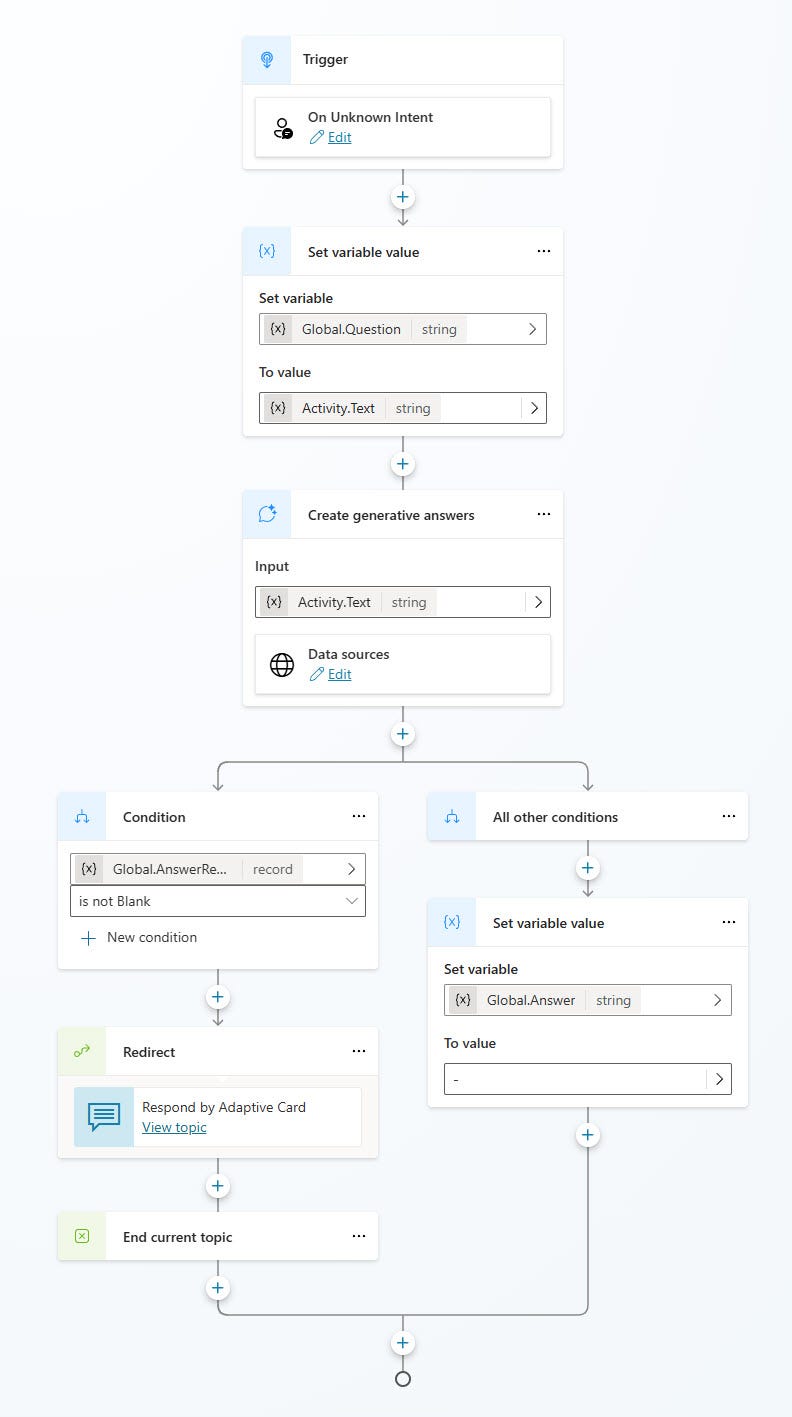
Let’s first store the user’s question and the bot’s response using “global variables” inside Copilot Studio.
1. Go to “Topics” → Select “System” → Choose “Conversational Boosting”
2. In the flow, after the trigger, click the “+” button
3. Choose “Variable Management” → “Set variable value”
4. Create a global variable like “Global.Question”
5. For the value, select “Activity.Text” (this holds the user’s input)
Then for the bot’s response:
6. Go to your “Create Generative Answer” action
7. Scroll to the bottom, find “Save bot response”, and set it to a “Global variable” like “Global.Answer”
✅ Now you’re capturing both question and answer.
Step 2: Set Up an Excel File for Logging
We’ll use Excel in OneDrive to store our logs.
1. Go to “OneDrive” and create a new Excel file
2. Add the following columns: `Email`, ‘Question`, `Answer`, `Timestamp`
3. Select the columns and create a Table from Insert tab(required for Power Automate)
Step 3: Build the Power Automate Flow
Now let’s bring it all together in a Power Automate flow triggered by Copilot.
1. Create a new “Topic” called “LogUserActivity” in Copilot Studio
2. Change the trigger to “On Redirect” as we will call it explicitly
3. Add a new action → Choose “New Power Automate Flow”
Then inside Power Automate:
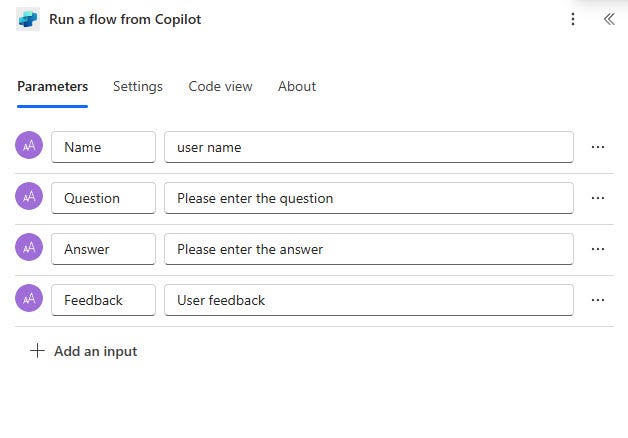
1. You’ll see “Run a flow from Copilot” and “Respond to Copilot”
2. Add an action: “Excel → Add a row into a table”

3. Select “Run a flow from Copilot” and create input variables like Email, Question, Answer. You also can add Feedback for this Article: Collecting User Feedback with Thumbs Up/Down in Copilot Studio – AI and Digital Transformation

4. Then go to Excel action and use these variables to populate the Excel fields

5. Save and publish your flow!
Step 4: Connect Your Flow Back to Copilot
Go back to your Copilot flow and connect the variables to the Power Automate flow inputs:
– Email: User.Email
– Question: Global.Question
– Answer: GLobal.Answer
– Timestamp: add a this formula formatDateTime(utcNow(),’mm-dd-yyyy’

Step 5: Redirect to Log Topic
- Add a “Redirect” action to your flow to call your new Topic after you set the global variable values.
- Your Copilot flow should look like the picture.
🎉 Done! Now every interaction will be logged into your Excel file.
✅ Final Tips
– Test with sample data before going live
– Don’t forget to publish all your changes in Copilot Studio
– You can expand this idea to push data into SharePoint, Dataverse, or even Power BI for richer analytics
Need a Hand?
If you’d like help implementing this — or want to take your chatbot strategy to the next level — drop me a line at [email protected]. Happy to chat!
Want to stay ahead of the AI curve? Follow me here or on LinkedIn and subscribe to my blog at aialchemysolutions.com for more hands-on AI solutions for business leaders.
